D2L Daylight is Coming!

Daylight devices

The Information Services & Technology Division recently announced that in May 2018, the D2L Learning Management System will transition to a new look and feel called, D2L Daylight.

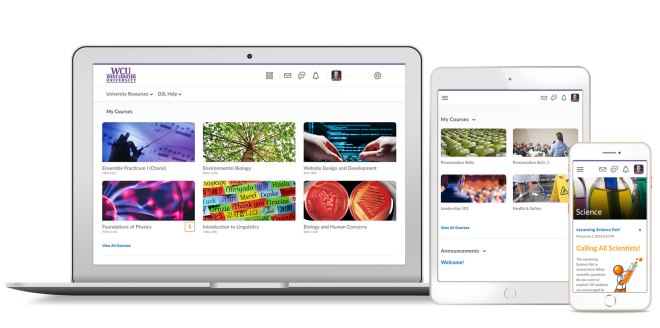
What is D2L Daylight? D2L Daylight is the name of the visual enhancement that will occur to D2L. The changes include a mobile friendly interface and a cleaner layout with course images. With the exception of how you access courses, all of the D2L tools you currently use will remain and continue to work the way they do now.

One of the significant benefits of D2L Daylight is that it improves the mobile interface for D2L. How information is displayed will change based on the size of the screen being used. This is called “responsive design” and is common in modern web design. You can check a sites responsiveness on a desktop or laptop by changing the size of the browser. If items resize and restack the website is responsive. With D2L you may need to refresh the page to get the items to display properly at the new screen size.

Faculty who teach distance education courses should contact their assigned instructional designer to discuss how D2L Daylight may impact their course design. Instructional designers can also help distance education faculty take advantage of the mobile friendly interface with new responsive module page designs.

Daylight improves accessibility and readability. Style updates include larger fonts, more space between text, a new color palette, and new icons and buttons. With these visual changes, we assure you that the general location of items is not changing. They are just getting a new modern look.

D2L Daylight is Coming! If you are interested in learning more or gaining sneak-peak access to the D2L Daylight interface, plan to attend a training event. IS&T is offering at least two formal training opportunities each month in virtual and face to face formats. Departments or programs can also request custom training by emailing d2l@wcupa.edu   or distanceed@wcupa.edu. For a schedule of events and additional information visit wcupa.edu/daylight.

Highlights:

  • Accessibility – Improvement to accessibility and readability.
  • Mobile Friendly – New responsive design for viewing on all devices and device sizes.
  • D2L Daylight Introduction Video

Reposted from the West Chester University Information Services & Technology Blog

Be Prepared

“Students think online courses are easy” is a common refrain heard from faculty in the Office of Distance Education.  The truth is online courses are hard.  They require specific skills to be successful.  How do we help students be prepared for that reality?  If you are a faculty member looking for ideas on how to help students be prepared for the rigor of online learning or a student who wants to make sure they are as prepared as they can be for an online course consider these resources from the Office of Distance Education.

eLearnReady

eLearnReady is a free web-based set of questions that evaluate a users readiness for online learning.  Developed by a group led by Dr. Corey Lee and Dr. Natalie Abell this tool asks students 40 multiple-choice questions covering 9 success factors.  Upon completion of the questionnaire, a user receives an email with their results along with resources and suggestions for improvement in each factor.  Anyone can take the questionnaire at any time.  It is an excellent self-assessment tool.

Faculty who want to collect course-wide data on all of their students using the tool need to create an account through which they issue invitations to students to participate in the survey.  Using the tool in this manner allows an instructor to see class-wide areas of weakness or strength and target instruction accordingly.

West Chester University faculty who are interested in incorporating this tool into their course should contact their assigned instructional designer for support and use ideas.

Orientation for Distance Education Students

A more involved option for preparing students to be successful is our Orientation for Distance Education Students.  Here is a 40 second introduction video:

Faculty must request access for their courses each semester they wish to use the orientation by contacting their assigned instructional designer. Students interested in completing the orientation on their own should contact Distance Education Support to gain access.

Tech Tip Tuesdays

Every Tuesday during the fall and spring semesters, the Office of Distance Education produces a short video on a new technology or tip for using a technology.  These are a great way to stay current and learn new skills.  You can see the full playlist of videos below.

Distance Education Support

Finally, faculty and students can always contact the Distance Education Support for assistance with anything related to distance education.  If you are struggling with something related to distance education, contact support.

Support can be reached by phone at 610-436-3373 or email at distanceed@wcupa.edu.  Hours are usually 8:00 am to 8:00 PM Monday through Thursday, 8:00 am to 4:30 pm on Friday, and 12:00 to 8:00 pm on Sunday.  Be sure to check the Office of Distance Education website to confirm the current hours.

Don’t be fooled into thinking online courses are easy.  Prepare yourself by making sure you know what it takes to be successful.

Social Media in Online Learning

Social media and online learning are two online features that are continuing to grow.  West Chester’s distance education courses have grown from just over 100 courses in 2012 to almost 500 course offerings today. Most student’s use social media every day, multiple times a day and even businesses use it for marketing and engaging with their customers. Incorporating social media into online learning would help students engage with other students and the school since they don’t come to campus for class.

When taking classes face-to-face, students get to interact with people in their classes who are also probably in their major or program of study. It is beneficial to students, to meet people who have similar goals as they do and are interested in the same areas or subjects.  Thefacebook-2048127_1280y can turn to each other for help and their work load is similar, so they can easily relate to each other about school. Sometimes these types of friends or companions are what helps people get through the tough times at school because they realize they’re not alone.  Students who are in fully online programs don’t get to interact everyday with other students.  By incorporating social media, students can create an online community similar to the interactions they would be having in a face-to-face class.

Facebook groups for a class is one way to help create an online community. By having a Facebook group for one class, the students in the class can post questions for other people in the class to help them out with.  If the professor is included in the group, the professor could share related material and encourage informal discussion for the class.

Becoming “friends” with students in their online class on Facebook, is also kind of like befriending them in class. It’s as if they are getting to know them a little better. If students found each other on Facebook, they’ll feel more comfortable talking with them via discussion in the online course and then asking them questions if they have any because it will give them a sense of knowing each other on a more personal level.

While Facebook is a great way to use social media in online courses, sobubbles-1968272_1280 is Twitter. Twitter allows students to share and tweet relative information.  Creating a course hashtag allows students to share information and then click on the hashtag and see basically a discussion or information related to only that course.  Students can follow the professor and see what they share, but even if they didn’t want to do that, professors could use the hashtag and share information that way. This is another informal way to create class discussion, but keeping it organized on the internet for just the class.

Learning management systems allow for class discussions and for students to interact with each other, but sometimes just being “inside” the course is a little intimidating. Student’s might find it a little weird to talk informally in a non-graded discussion. Bringing student’s “outside” the classroom and onto social media can help students interact on a more personal level with each other and create connections with people in their classes.

The Note-Taking Method You Should Try

If you’re like me, note-taking may be a futile task; no matter how hard you try, you wind up with a jumbled mess. You want to take good notes so that you can use them to study later, but cannot seem to find a system that works for you. The Cornell Note-Taking System (or a variation of it) might be your saving grace. My eighth grade English teacher introduced me to this way of taking notes, and I have adapted it to my own learning style. I have used it ever since, and it has gotten me through high school, college, and my career thus far. It may not be for everyone, but if note-taking is something you struggle with, I highly recommend giving it a shot.

What is it?

The Cornell Note-Taking System, or the Cornell Method, was developed by Walter Pauk who was an education professor at Cornell University. To take Cornell notes, first draw a line down your sheet of paper, a third of the way in. This gives you a skinny column on the left side, known as the Cue-Column, and a thick column on the right, known as the Note-Taking Column. Once your page is set, it is time to run through the five steps of note-taking, as described by the Learning Strategies Center of Cornell University:

  1. Record – Use the Note-Taking Column to record your lecture notes.
  2. Question – Formulate questions or cue words, and write them in the Cue-Column.
  3. Recite – Cover the Note-Taking Column and quiz yourself on the questions or cue words.
  4. Reflect – Reflect on the significance of the material.
  5. Review – Write a brief summary of the notes (about a paragraph) at the bottom of the page.

When you’re finished, you will end up with something like this (hopefully with much better handwriting and more interesting/accurate information):

Cornell2

A Variation

The way that I actually take notes slightly differs from the Cornell Method. I write key-words, questions, or section headings (if I’m taking notes on a reading) in the Cue-Column as I go. I use the Note-Taking Column to fill in details about each subject. This method works well digitally as well as manually. Below is an example of some notes I typed up using OneNote:

CornellExample

When I’m finished taking notes, I still have a really great Cue-Column and can easily transfer the information over to index cards.

Final Thoughts

The Cornell Note-Taking System makes studying easier. If note-taking is something that you feel you can improve on, I highly recommend giving this method a chance. You can even adapt it like I did, and still wind up with a clean, finished product.

Stop Dancing the Slideshow Browser Mambo

During the summer of 1995, I was hired as an intern at a company that provided training for some of the most popular computer applications of the day. They had several labs filled with Macs and PCs, and I was part of the team that made sure all of these machines were running smoothly and had the appropriate software installed. From time to time, we had an issue with one of the PCs that was so severe, the only way to fix it was to reformat the hard drive and reinstall everything from scratch. These machines were running Windows 3.1, which meant sitting in front of the computer inserting and ejecting whichever of the six floppy disks it needed to install the OS. Wanted Photoshop too? That was nine more floppies. Office? 24 floppies. There were a lot of floppies back then. A lot. In our office, this mind-numbing installation ritual became affectionately known as “The Floppy Disk Mambo.”

2665916336_bc34de1184_o
“There were a lot of floppies back then. A lot.” Photo by Saulo Pratti is licensed under CC BY 2.0 and has been modified.

Fast-forward to today, and thankfully no one dances The Floppy Disk Mambo anymore (when was the last time you even installed something from CD?). But there’s a similar dance that has plagued us since the mid-90s, which I’ll call “The Slideshow Browser Mambo.” Anyone who has given a presentation using Keynote or PowerPoint has experienced this: you’re discussing a web page that you want to show to your audience, so you include the URL on a slide and click on it at the appropriate time. What happens? Your slideshow goes out of presentation mode and a browser window appears. After talking about the web page, you go back to your presentation program (which is now in editing mode), reenable presentation mode, figure out if you’re at the right slide in the presentation, and resume your talk. Whether you’re standing in front of an audience or recording a screencast, this is an unwanted interruption that temporarily throws you off track.

Thankfully, the same people who developed the audience polling software Poll Everywhere have given us a reason to put our dancing shoes away (or at least save them for actual dancing). Their free program, LiveSlides, allows you to insert a slide into a Keynote or PowerPoint presentation that is actually a full-screen browser window displaying the URL of your choice. When you’re done with the web page, just press the advance button on your remote control, click the mouse off to the side of the page, or touch the right arrow on your keyboard to move on to the next slide. The web page acts just like any other slide in your deck and you never leave the presentation program.

This slideshow requires JavaScript.

I used LiveSlides for the first time back in March at a presentation I gave at the University of Delaware Educational Technology conference. In this presentation, I was able to mix in multiple web pages from seven different sites among my regular Keynote slides without any problems. On my Mac, the LiveSlides application had to be open while I was presenting, but it was happy to stay hidden and out of the way. PC users will discover that the program installs as an add-in for PowerPoint.

Whether you’re presenting at a conference or recording a screencast for your online or blended course, I highly recommend this application. Not only will it save you time, it’ll also improve the flow of your presentation.

How to Customize Your Blend

Photo of Blender

Here at West Chester University, teaching a blended course means that anywhere from 30% to 79% of your course can be taught online. That’s a big range. So it’s not surprising that I often meet faculty who are struggling to find their unique blend of online and face-to-face instruction for their blended course. What should go online? What should be done face-to-face? Isn’t there a formula for this?!?

Photo frustrated woman at computer

Unfortunately, there’s no formula, but there is a method for “customizing your blend”:

  1. First, look at your lesson plans. What learning activities are best suited to your objectives? Forget about the mode of delivery for now- the very first thing you want to do is determine the ideal learning experience for each week’s lesson, unit, or module. What would be the absolute best learning experience for your students? Write out an outline including all the learning activities for your course if you haven’t already.
  2. Next, analyze the elements of each learning experience and start sorting. Is there anything that naturally lends itself to an online environment? What experiences will work best in the classroom? Can you think of ways to keep students connected and engaged as they move between online and face-to-face formats?
  3. Now you’re ready to start exploring how technology can support and enhance the learning experience. At West Chester University, you have access to the Desire2Learn LMS and tools such as Adobe Connect and VoiceThread. There are also countless, free, web-based tools available online. The key is remembering that the learning experience should be the focus, not the technology!

It’s only three steps, but they are big, messy steps and like the first few steps at my house, they’re kind of cluttered with leaves and a basket meant for shoes that’s instead full of mail, toys, and who knows what else until I sort it. Figuring out your customized blend can be challenging whether you’re working with an existing course outline or building one from scratch. Don’t be afraid to reach out to the instructional design team in the Office of Distance Education at any step in the process.

Tips on Writing a Professional Email

Image result for email

With professionals depending more on technology to run their business, clear and concise online communication is critical. Who wants to receive an email from someone who does not use proper etiquette, sounds unprofessional or that you can’t even figure out what they are trying to say? It will turn you off right away and also make the person or business look bad.

When I got to college, I panicked. Writing emails to my professors was my first attempt at writing professional emails. I wasn’t sure how to word my email, without coming across as if I am talking to one of my friends and I wanted them to take me seriously.

When I was applying for my first job, the posting stated to email your resume directly to the manager. I couldn’t just attach the email and call it a day. I had to provide a cover letter, providing background about myself and I wanted to stand out! What I wrote in that email could essentially dictate whether or not I got the job.

So I want to share 5 tips I think are important when writing a professional email because believe me, writing professional emails won’t stop when you graduate college.  You will use this skill all your life.  Always:

  1. Provide a subject
    • Make sure the subject is clear, if you are inviting them to a meeting, put the date, time, etc.
    • Keep it short and specific
    • Don’t use broad phrases such as, “Important information” or “Help!” state in the subject line what you need, for example, “List of Student Parking Lots” or “Error logging in to D2L.”
  2. Lead with a greeting prior to the person’s name
    • Begin by saying “Dear _____” or “Hello _____.” (“Hi” is considered non-professional)
    • Don’t just write their name, it’s too direct. This is the first way to show that you see them as a professional.
    • Make sure to take note of the person’s professional status (prof. or Dr.)
  3. Include the reason for your email in your first 2 sentences followed by a call to action
    • Explain why you are emailing them, whether it is an issue they need to fix, information they need to know, etc.
    • Provide a response date, so they will respond when you need the information
    • Follow with what you want them to do. “Let me know if you have any comments or concerns…” helps with getting an answer back. Also, “Please advise” is another way to say you require help.
  4. Say “please” and “thank you”
    • Being polite goes a long way in the real world and that shouldn’t stop in an email.
    • Say “please” if you are asking them to do something.
    • Always say “thank you”, even if it’s just for the time they took reading the email.
  5. Include a signature
    • Make sure the signature contains your name and how to contact you
    • Adding your email address may be an unnecessary step because they can just hit reply and answer you; instead include your phone number and maybe a link to your LinkedIn account.

Before hitting send ALWAYS check your grammar and spelling, and don’t forget to proofread so you don’t miss any mistakes!

Meet SARA

saragood

On December 7, 2016 West Chester University (WCU) became a participant in the State Authorization Reciprocity Agreement (SARA). If you are an out-of-state online student, this is most likely very good news for you, as SARA allows WCU to offer online programs to students in 48 different states/districts.

A Little Background

Back in 2010, the United States Department of Education tried to pass a regulation that would require institutions to be authorized to operate in any state that students resided, in order to offer federal financial aid. The regulation was canned by a federal court ruling in 2011. Although the federal regulation is unenforceable, institutions must still adhere to state regulations.

The Problem

Each state has its own set of regulations, and not all states regulate the same activities. Common activities that are regulated include:

  • Advertising and recruiting that is targeted to residents outside of the institution’s home state.
  • Internships, Clinical Placements, and Field Experience taking place outside of the institution’s home state.
  • Offering online programs to residents outside of the institution’s home state.
  • Faculty, or staff, working for the university outside of the institution’s home state.

Trying to track regulations state-by-state created a TON of work for institutions. With that in mind, plus the burden of cost associated with obtaining state authorizations, it was clear that a better solution was needed. This is how SARA was born.

What exactly IS SARA?

SARA is an agreement among member states, districts and territories which establishes a uniform set of guidelines and regulations to adhere to. It is intended to make it easier for students to take online courses offered by out-of-state institutions, and it is one-hundred percent voluntary for states AND institutions to join SARA.

The map below shows WCU’s status with State Authorization. The green states are SARA states, which means that WCU can conduct activities in the state so long as they are within SARA regulations. The yellow states are not yet part of SARA, however WCU is currently exempted from obtaining authorization in those states. The red territory is not yet part of SARA, and WCU has not sought out authorization to conduct activities there.

stateauthorizationmap

What is, and is not, covered by SARA?

Any activity conducted in a SARA state that DOES NOT trigger a physical presence is covered by SARA. SARA’s Physical Presence Standard can be found here. The most important things to know are that WCU can offer online programs to out-of-state students, advertise to out-of-state students, operate limited field experiences, and have faculty/academic personnel residing in SARA States.

While SARA does alleviate a lot of the work that goes into tracking state authorizations, it does not cover programs that lead to a professional license. We state on our website that if you are considering an academic program that leads to a professional license in your state, you should first seek guidance from the appropriate licensing agency in your home state BEFORE beginning the academic program located outside of your state.

Hands on Science Labs for Online Students- We can do that!

“How do you provide an authentic laboratory experience for science students in online education?” the associate dean asked me during our new staff orientation.  Knowing that this was a very common question posed by science faculty, I paused for a moment before mentioning the only answer I knew at the time, that there were a number of computer programs and websites available that would simulate various science laboratory experiments. The associate dean listened politely then said, “Those do have some value, but it still isn’t the same as a real lab experience.”  Recognizing that the dean was right and not knowing any better, I let the point drop and we moved on to other topics.

Fast-forward a year later and now I would say the associate dean is only partially right.  Here is why. For introductory online science courses there are options to use:

  1. Home kitchen labs which make use of everyday materials found in your kitchen to conduct simple experiments that still provide the hands-on experience.  These experiments are limited to what students can find in a kitchen and must remain relatively safe to conduct in a home setting.
  2. Commercial lab kits which can be sent directly to a student and contain everything students need to safely conduct a number of laboratory experiments just as they might in a regular face-to-face on campus lab course.  These kits offer the ability to do more than kitchen labs, but are still limited to experiments that can be done safely in a home setting.
  3. Remote controlled robot based labs where students from off-site control robots which manipulate the experiment materials in an on-site laboratory.  This type of lab allows students to participate in slightly more complex and hazardous experiments without needing to be on campus. This type of remote lab costs more then the other two options and can sometimes require additional training in how to use the robots.

If you were paying attention, you may have noticed what I described is for introductory science courses.  At this time, there are not yet great solutions available for the more complex and advanced scientific experiments conducted in upper level laboratory courses.  Virtual reality tools hold some promise to eventually be a possible solution; however, they need to become more affordable and realistic before they will be a viable solution.

So where does this leave us?  If you are a science faculty who is interested in developing an online science course, but has been stuck on the laboratory component, come talk to us here in the Office of Distance Education.  As this article has demonstrated, there are solutions available.  We are eager to work with you to find the right mix of laboratory options among those listed here and other possibilities to develop an online laboratory course that does provide an authentic laboratory experience for science students.


Three Alternatives to PowerPoint

Whether you’re preparing for your next lecture, or presenting your most recent assignment to your classmates, there is a good chance that you are going to to want to prepare a slideshow. PowerPoint has become a staple in presentation software, and it’s not hard to see why. The program is fairly easy to use, widely available, and has enough tools to make your presentation as simple or complex as you please. There is no doubt that PowerPoint will get the job done, however using the same software over and over again can grow boring. Here are three alternatives to PowerPoint that you can consider the next time you need put together a presentation:


prezi

  1. Prezi

Prezi is a webtool that can be used to create dynamic presentations. I like to think of it more as a journey than a slideshow. You create a “big picture” which serves as the first “slide”. This gives the audience a sneak peek of what the presentation will be about, and the progression it will take. You can then zoom into certain spots of the picture to highlight key points. Unlike a traditional slideshow, you can choose to make the presentation linear, circular, or something entirely different. Prezi provides a host of pre-made templates, or you can start with a blank canvas and create something new. Prezis can be shared with other people by providing them with a link. You can also embed Prezi presentations directly into a webpage, blog post, or discussion board. Basic features of Prezi are free, but users have access to more with a monthly subscription. Check out the video (created by the Prezi Team) below to learn the basics of Prezi.


googleslide

  1. Google Slides

Google Slides is a web-based application available through Google Drive. Although Google Slides has a very similar setup to PowerPoint, I like the fact that it is integrated to Google Drive (Check out this post where I talk about some of the things I like about Google Drive). You can create slideshows utilizing most of the same features found in PowerPoint, and Google Drive makes collaborating and sharing a cinch. Working on a group presentation? You can give editing power to members of your group. Presentations can be shared by providing the audience with a link, or you can embed the presentation in an online medium of your choosing. The Google Slides app can be installed on your computer, tablet, or smartphone for free, making it easy for you to edit on the go. Learn how to get started with Google Slides here.


haikudeck2

  1. Haiku Deck

Haiku Deck provides you the essentials needed to create a sleek and simple slideshow. Have you ever sat through a presentation where the presenter just reads a bunch of words verbatim off of their slides? Annoying, right? Haiku Deck discourages their users from doing this by providing layout options that work best with clear, succinct points. One resource available in this tool, which I really enjoy, is access to a library of royalty-free photos that you can incorporate in your presentation. It takes away the hassle of scouring the web for images. Haiku Deck also allows users to create graphs and charts with ease. Like Prezi and Google Slides, Haiku Deck presentations can be shared by providing your audience with a link, or they can be embedded to your blog, course, website, etc. Users can create three presentations for free, or an unlimited number of presentations for a monthly fee. Explore the Haiku Deck Gallery here.